Text Classification for Sentiment Analysis
Old oudated version. A new one is in progress ...
The Internet Movie DataBase (IMDb) is a huge repository for image and text data which is an excellent source for data analytics and deep learning practice and research. A quick Google search yields dozens of such examples if needed.

In this tutorial we will use the Large Movie Review Dataset (from Stanford University) which consists of 50,000 movie reviews (50% negative and 50% positive). The set is divided to training and validation datasets (each with 25000 movie reviews with equal number of positive and negative reviews).
Our objective is to create a neural network (as a Keras model) that can predict if a given movie review is positive or negative. This type of computation is also called Sentiment Analysis, as we try to train our neural network to predict the sentimental value of a movie review (negative or positive?).
The seminal research paper on this subject was published by Yoon Kim on 2014.
In this paper Yoon Kim has laid the foundations for how to model and process text
by convolutional neural networks for the purpose of sentiment analysis.
He has shown that by simple one-dimentional convolutional networks, one can develops very
simple neural networks that reach 90% accuracy very quickly.
There's still very high research activity in this field as we write this tutorial ...
https://github.com/alexander-rakhlin/CNN-for-Sentence-Classification-in-Keras/blob/master/docs/1408.5882v2.pdf
To demonstrate Kim's ideas, we will closely follow the code in
the imdb_cnn.py example from the Keras github repository:
https://github.com/fchollet/keras/blob/master/examples/imdb_cnn.py.
We will try to complement it with more explanations and annotations and add
complementary code.
The IMDb datasets are automatically downloaded by the code below, but if needed (for other tests), it can also be downloaded (as a pickle file) from:
- https://s3.amazonaws.com/text-datasets/imdb_full.pkl
- https://s3.amazonaws.com/text-datasets/imdb_word_index.pkl
These datasets are already encoded to numbers.
The actual text datasets can be downloaded from:
http://ai.stanford.edu/~amaas/data/sentiment
# These are css/html styles for good looking ipython notebooks
from IPython.core.display import HTML
css = open('style-notebook.css').read()
HTML('<style>{}</style>'.format(css))
from keras.preprocessing import sequence
from keras.models import Sequential
from keras.layers import Dense, Dropout, Activation
from keras.layers import Embedding
from keras.layers import Convolution1D, GlobalMaxPooling1D
from keras.datasets import imdb

from matplotlib import rcParams
rcParams['axes.grid'] = True
rcParams['figure.figsize'] = 10,7
%matplotlib inline

# fixed random seed for reproducibility
np.random.seed(1337)
Parameters
max_features = 5000
maxlen = 400
batch_size = 32
embedding_dims = 50
nb_filter = 250
filter_length = 3
hidden_dims = 250
nb_epoch = 4
Loading data ...
print('Loading data ...')
(X_train, y_train), (X_test, y_test) = imdb.load_data(nb_words=max_features)
print(len(X_train), 'train sequences')
print(len(X_test), 'test sequences')
Lets take a look on item 0 of this data
print(X_train[0])
What we see is a list of integers. Each integer represents one word in a movie review. That is, our movie review has been converted to a list of integers. Each word in our movie review vocabulary has been indexed by a unique integer. Here is the text of an example review from our dataset:

A simple parsing and indexing can map each word in our movie review database to a unique integer like in this example:

It should be noted that only words with a minimal level of frequency are entering the vocabulary.
Words with low frequency are simply ignored (and are masked by index 0).
This process is described in Yoon Kim's paper above and also in this tutorial:
http://www.wildml.com/2015/12/implementing-a-cnn-for-text-classification-in-tensorflow/
Sequence Padding
Obviously, movie reviews are not expected to have the same text length (number of words). However, neural networks are expecting a fixed size of input vector. We will therefore have to either truncate long reviews or pad short reviews with special word paddings (like with a null word such as "<PAD>" that does not have any meaning, and can be encoded by 0). We use the Keras sequence.pad_sequences utility for this task.
X_train = sequence.pad_sequences(X_train, maxlen=maxlen)
X_test = sequence.pad_sequences(X_test, maxlen=maxlen)
print('X_train shape:', X_train.shape)
print('X_test shape:', X_test.shape)
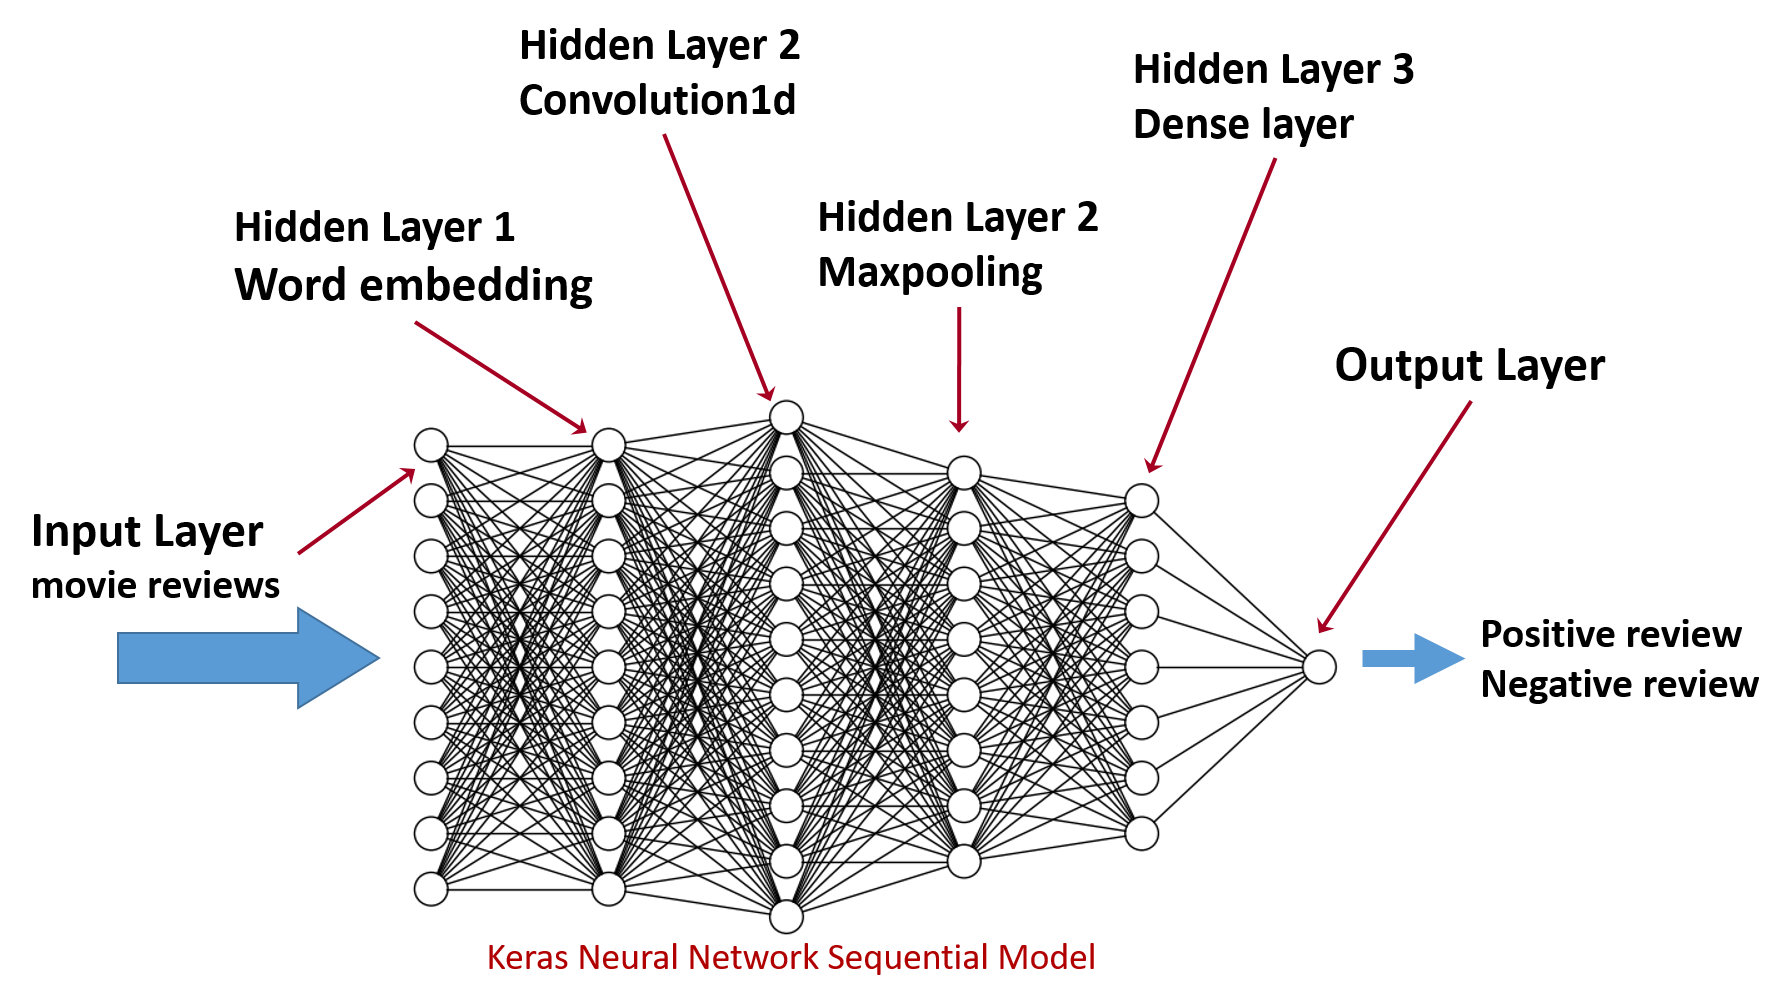
Create a Keras Neural Network Model
We will define a Keras sequential model (feed forward neural network)
with four hidden layers as in the following diagram
model = Sequential()
Word Embedding (word2vec)
After creating the initial model, we need to populate it with the four hidden layers that we need. With text classification, the first layer is usually an embedding layer in which word indices that come from the input layer are converted to word vectors (word2vec). This is an important conversion which enables a more efficient and faster processing of textual data. Each word integer is mapped into a one dimensional vector of floats which captures its syntactical properties within the movie reviews text corpus. This subject may be covered in a little more depth at the course if time allows. At the moment, more explanation can be found in the Tensorflow and Google code archives and other blogs:
- https://code.google.com/archive/p/word2vec
- https://www.tensorflow.org/tutorials/word2vec
- https://www.youtube.com/watch?v=T8tQZChniMk&list=PLR2RxXcwFe533vpJhgiDOAONyRzj3lzbJ
- http://colah.github.io/posts/2014-07-NLP-RNNs-Representations
Here is how this done in Keras:
model.add(Embedding(max_features, embedding_dims, input_length=maxlen, dropout=0.2))
Adding a Convolution1d Layer
After the embedding layer, comes convolutional layer. Since our word vectors are one dimensional, we only need 1-dim convolutions. Keras provides us with a built in method for doing it elegantly. Note that we need to specify a convolution kernel length and number of filters to use (nb_filter). More info about parameters and usage at: https://keras.io/layers/convolutional/
model.add(
    Convolution1D(
        nb_filter=nb_filter,
        filter_length=filter_length,
        border_mode='valid',
        activation='relu',
        subsample_length=1,
    )
)
Maxpooling Layer
model.add(GlobalMaxPooling1D())
Dense Layer
model.add(Dense(hidden_dims))
model.add(Dropout(0.2))
model.add(Activation('relu'))
Output Layer
Our output layer consists of one neuron. The sigmoid activation will produce a float number between 0 and 1. We can round it to 0 or 1 to conclude if the movie review is negative or positive, or we can interpret it as a fuzzy value of how much the review is positive or negative.
model.add(Dense(1))
model.add(Activation('sigmoid'))
Compilation
Now we compile our model
model.compile(loss='binary_crossentropy', optimizer='adam', metrics=['accuracy'])
Training
And finally we train the model with our training dataset (X_train and y_train). It turns out that with only 3 epochs we are able to reach 89% validation accuracy! Which takes less than 5 minutes on a standard home pc!
h = model.fit(
    X_train,
    y_train,
    batch_size=batch_size,
    nb_epoch=nb_epoch,
    validation_data=(X_test, y_test),
    verbose=1,
)
loss, accuracy = model.evaluate(X_train, y_train, verbose=0)
print("Training: accuracy = %f  ;  loss = %f" % (accuracy, loss))
loss, accuracy = model.evaluate(X_test, y_test, verbose=0)
print("Validation: accuracy1 = %f  ;  loss1 = %f" % (accuracy, loss))
The training accuracy reached 97.55% which is a a bit overfitting. What counts is the validation accuracy which is 89.16%, which is of course not bad considering the minimal effort it took to obtain it.
Course Project
The following two files consists of 10,662 movie reviews (half positive, half negative). Each single line in this file is one movie review (so you'll need to do some parsing).
- http://www.samyzaf.com/ML/imdb/pos.txt
Create two data sets, one for training which consists of 8662 samples (50% positive, 50% negative), and a second data set for validation with 2000 samples.
- Define a neural network for predicting a review sentiment as above
- Try to obtain 95% precision accuracy.
- Feel free to experiment with the number of filters and filter size in you convolutional layer. You can also experiment with several convolutional layers and maxpooling layers, etc.
- Try also to experiment with different activation functions such as SReLU, leaky relu, or PReLU, etc ...